Posts

Mother's Day make

Image
This was a recent project that I made especially for my Mum for Mother's Day... it may look complicated or hard to achieve but it was simple to make and I think it looks amazing. I wish I could take all the credit for this design but I have Sam Calcott to thank and you can follow her tutorial if you follow this link... Sams tutorial The flowers were almost all created by using the free die sets from these magazines...     I started off by taking a 6x6 inch card blank and my large plain nested circle dies and placed some on top to find which would be the best size and then I took the next from a couple of sizes down and cut them out together to created a wreath shape. I scored my card blank on the front only at 3 inch's to give me an easel style. My next job was to chose some paper from my stash which I would use to mat     and layer onto the front part of the cut out section. Once this was done I  used the smaller of the two        ...

You’re Roarsome

Image
 Today I am sharing this cute little card that is featuring products from Clearly Besotted. Prehistoric Plushies  and You Rock stamp sets and the  Pave the Way  stencil. I started today’s make by taking the mountains and volcano stamp from the Prehistoric Plushies set and stamped it with Memento Tuxedo Black Ink as I wanted to use my Alcohol Markers onto some white card.  I also stamp it onto a piece of masking paper which I fussy cut and this enabled me to ink blend the sky without colouring the mountain piece! I used Squeezed Lemonade Distress Ink first behind the mountain range and then blended it out with some Scattered Straw, next I added some Wild Honey into the mix and then around the top and edges I put some Dusty Concord. Whilst I had the mask in place I used the Pave the Way stencil with Pumice Stone Distress Ink to give me my foreground. I then used my Spectrum Noir Alcohol Markers to colour the mountains and volcanos. I started with Brown Grey Blend ...

You Arrrrgh...

Image
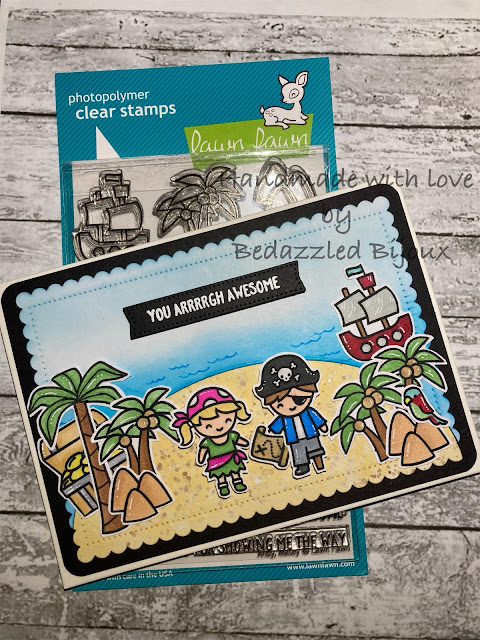
Today I am sharing this treasure hunt inspired card using the  Ahoy Matey  stamp set from Lawn Fawn. I started off by cutting a frame from my stash, then using an oval die, I cut a piece that I wanted to turn into sand from the frame. I used Scattered Straw Distress Ink, all over my piece of card and then watered down some more Scattered Straw on my Waffle Flower Mini Media Mat  and splattered it onto the card. I also used some of my Creative Expressions Cosmic Shimmer Watercolours  in gold from the Christmas set to add some sparkle splatters to the sand to add a little more depth and definition. I next turned my attention to the sea and the sky. I ink blended some Tumbled Glass Distress Ink with a little Broken China for the sky and some Salty Ocean and Mermaid Lagoon for the sea. Then set all my background to one side whilst I worked on my images. I stamped all the images with Memento Tuxedo Black Ink as I wanted to use my Spectrum Noir Alcohol Markers to colour th...

Bunny Love

Image
Today's project is a card featuring Time for Tea Designs. I started this make by stamping the cute little bunnies from the  Cosy Winter  stamp set with Versa-fine Onyx Black ink as I planned to colour these with Distress inks. I used Pumice Stone and Tumbled Glass on the darker bunny and Antique Linen and Picked Raspberry on the lighter one, with a little Picked Raspberry for both of their ears. I also coloured a piece of card with the Picked Raspberry to use later and set these aside to dry whilst I made the background. To create the dotty look I used a stencil that came with Crafters Companion monthly box kit  #14 and my Make Art Satytion . I ink blended Picked Raspberry, Cracked Pistachio and Mermaid Lagoon. I next die cut a stitched circle from white card using the Circle of Love  die set from T4TD and added a little Pumice Stone Distress Ink to create some ground for the bunnies to sit on. Then remember the piece of Picked Raspberry that I said I coloured, I use...

U R Purr-fect

Image
 Today I am sharing with you this card using Time for Tea Designs. I have used the  Pawsome Pets  digital stamp for the cute kitty and the dog and the  Smitten Kitten  add on digital stamp for the box of chocolates, the envelope and the bow in the kitty's fur.  After I had printed them out using some Crafters Companion printable light card I used my Spectrum Noir alcohol markers to colour them. I used the Muted Brown blend for the dog, with some True Blue blend for the collar and Ice Grey blend for the kitty and the envelope, Antique Pink blend for the box of chocolates and the heart on the envelope and then Pale Pink blend for the bow, I used my Sakura Gelly roll white pen to add highlights to all my images and then i fussy cut them and put them to one side whilst I worked on my background. I die cut a frame from my stash and then using the  Pawsome Pattern stencil  from T4TD and my Make Art Staytion I blended Distress Ink in Spun Suga...

Wishing you a...

Image
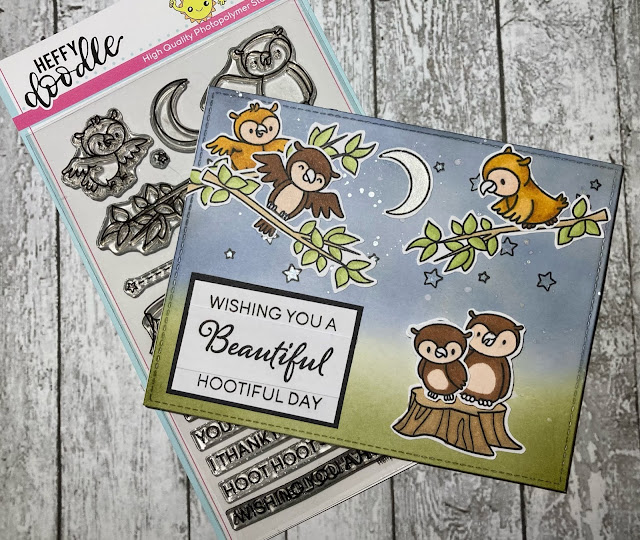
 Todays card features products from Heffy Doodle. This card uses the  Hootiful  clear stamp set from Heffy Doodle.  I started by stamping the owls, branches, and tree stump images with Memento Tuxedo black ink as I wanted to use my Tri Blend Alcohol markers by Spectrum Noir to colour them but I stamped the moon with Versa-fine Onyx Black as I planned to colour this with my Cosmic Shimmer Iridescent watercolour paints. I used Snow Angel from set 7, Christmas which you can find  here . Next I move on to colouring my images and I used the following colours:  Unfortunately I do not yet own the coordinating dies to this stamp set so I had to fussy cut them out after this I placed them to one side and moved on to creating my background. I used the outer frame from Heffy Doodle's  Clover Frame Dies  to die cut myself an A2 panel to create my background on. I used the Distress Inks shown on the top line below (Scattered Straw, Chipped Sapphire and Black S...

Owlsome!!

Image
 Today's card features Time for Tea Designs products. To start with I took a 6 x 6 inch card blank and then using my nesting square dies, I cut a piece of red glitter cardstock from the Works, to make a layer. I next took another of the square dies and die cut a white layer, which I stenciled with the T4TD Starry Heart 6x6 stencil using Festive Berries Distress Ink and then placed to one side to dry. I then moved onto stamping the owl, branch and sentiment from T4TD Be Owlsome stamp set. I used Memento Tuxedo Black as I wanted to use my Tri Blend Alcohol Markers from Spectrum Noir. I used the following pens: Ice Grey (IG2, IG4 & IG5) Ice Grey Shades (IG8) Earth Brown (EB3 & EB2) Alpine Green ( AG1 & AG3) Dark Red Blend (DR1, DR3 & DR4) Coral Blend (CR3 & CR5) & Magenta Blend (MG2 & MG3). I used the coordinating dies to die cut the owl and the branch and then added some white Gelly roll pen to add highlights and I created a frame around the sentiment with...